ASP.NET Core Web Store Template
By Krystal Ruwoldt
Updated 3/9/2021
See the source code for this project:
This is a demo ASP.NET Core Web Store that uses Bulma 0.9.1, Vue and a common payment provider. This demo has it's logic separated into domain, database, application and UI layers following the single responsibility principle so that it can be scaled as necessary. I use this demo as a starting point or as a boilerplate solution to significantly cut down on development time of a web store project for a client.
Table of Contents
Design & Planning
Purpose
The main purpose of this project is to establish a 'boilerplate' template that I can use to setup a client's new website quickly and efficiently. This template is based on a client that is after a web store site to sell actual products. I have made the project as generic as possible to allow the project to be extended in a number of different directions depending on the type of product sold or other client needs.
Initial Planning
Similar to how I planned my Django Small Business Website Template, I researched the components I wanted to include in the template and worked out the data structure. I browsed many different business and organization websites that sold various products and did some research into data structures of inventory based programs. That research along with my prior knowledge of accounting systems (I have worked in various accounting/finance roles in the past - so I am VERY familiar with the workings of MYOB and Quickbooks!) I designed a rough database schema and set up basic models in the domain layer.
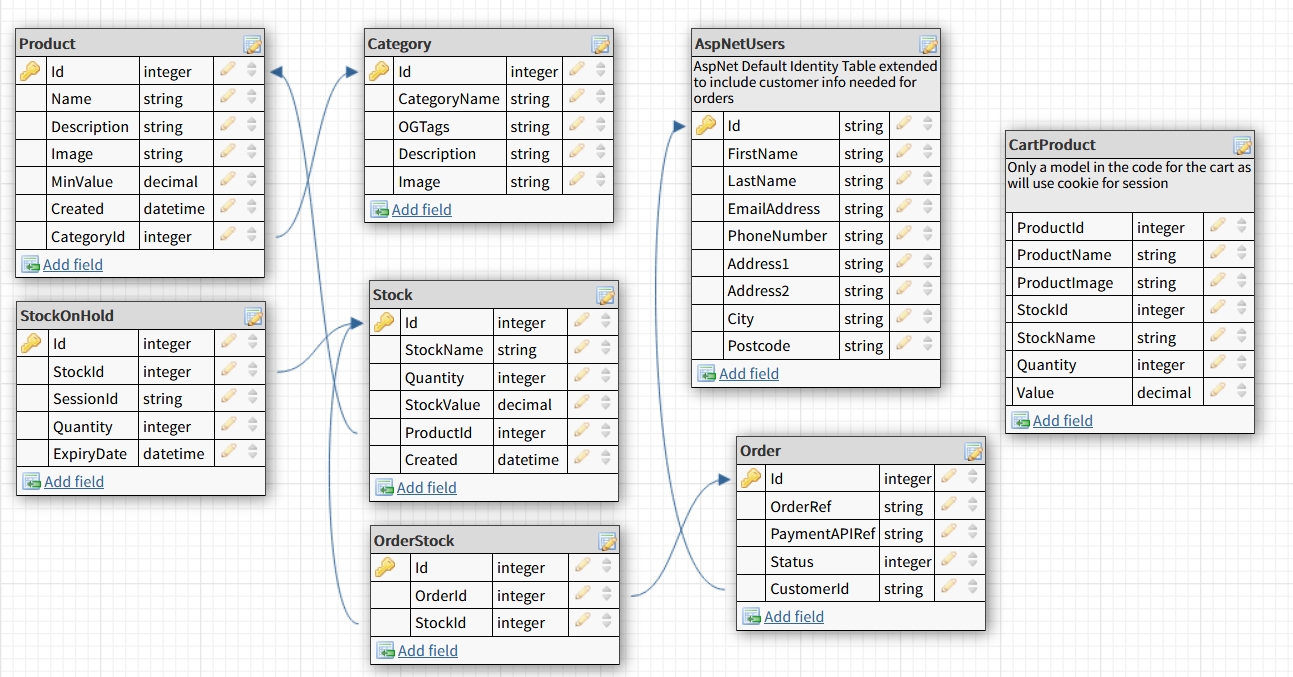
Early database schema drawn using DBDesigner.
Early on, I decided to make use of session cookies to save user cart data, rather than save this in the database. The session Id of the cookie could then be saved as part of the stock on hold data and then the stock on hold would update depending on what quantities of stock users had in their carts at any one time. Stock on hold could then be 'expired' when users deleted items from their carts, placed a successful order or never followed through with an order after a predetermined time limit.
Development
Project Setup
Since the goal was to create a generic template following the single responsibility principle, I set up separate projects in the solution early on. The Domain layer would contain the models, enums and service interfaces. The Database layer would contain the application's database context, and implementations of service interfaces. The Application layer would contain the service logic such as CRUD operations and shopping cart logic. The UI would make use of Vue.js (particularly in the Admin User Panel) for managing products, stock and orders. A basic dependency diagram of the layers and how I planned them to interact with each other is shown below.
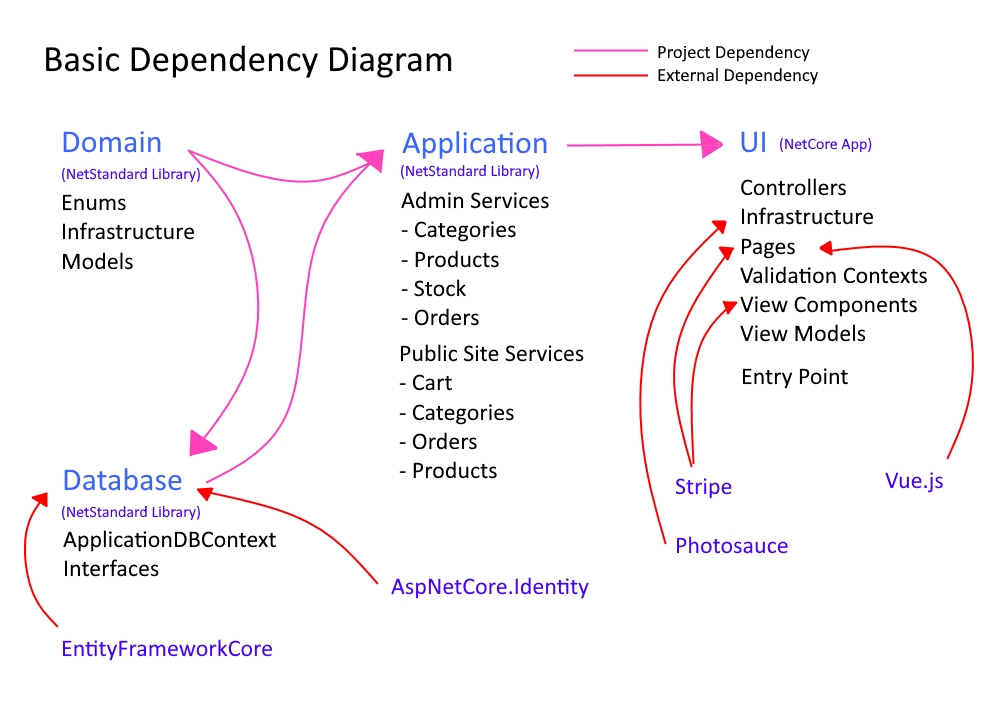
Basic dependency diagram showing project and external dependencies
Admin Panel
The basic CRUD operations in the Application layer of the project were then developed, that would allow products and stocks to be manipulated by the admin user. These operations use an implementation of the manager interfaces that reside in the Database layer so that Entity Framework Core package does not need to be referenced in the Application layer itself. Early in the project the database context was being accessed directly in the Application layer but using the manager interfaces allowed the references to the database context to be removed, making the overall project more portable and keeping individual classes responsible for only one task or function, adhering to the single responsible principle. See this link to a commit I made to the repository on 12 January 2021 to see an example of I achieved this.
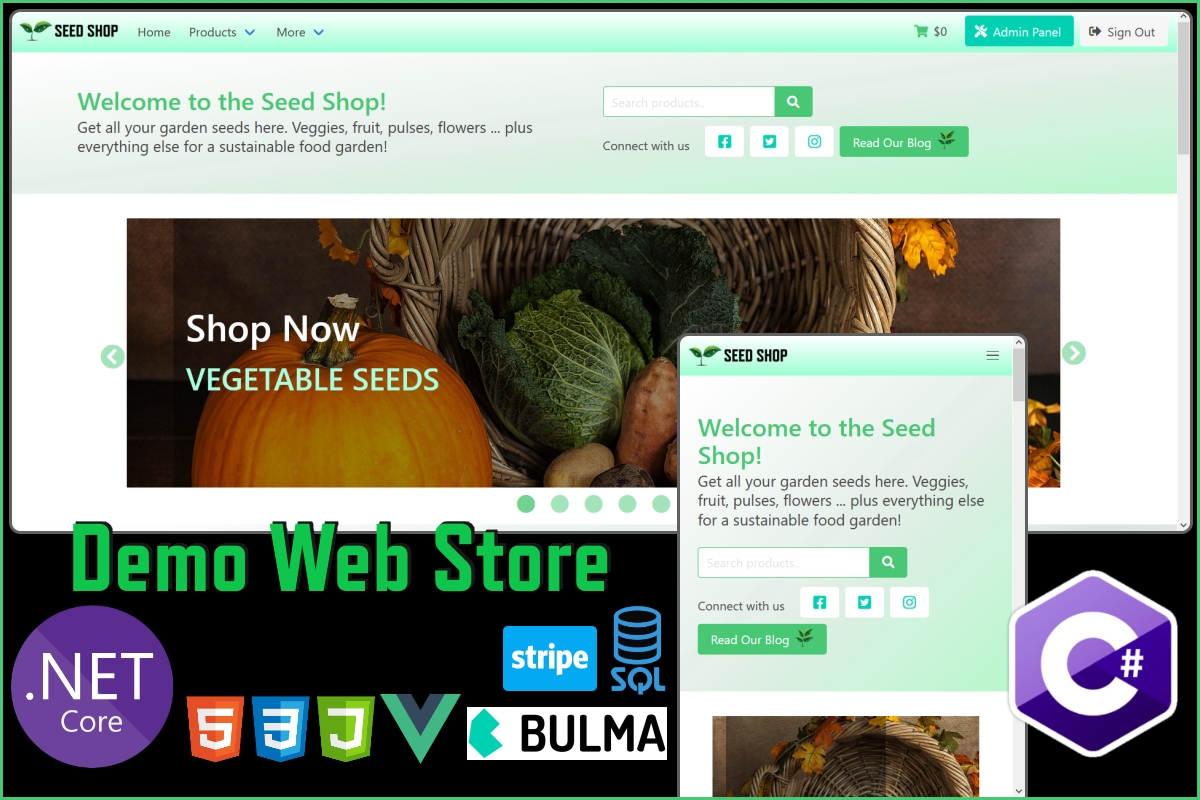
I developed admin panel pages using Bulma for the CSS and Vue.js with Axios to populate and push the data from the UI layer. At this point I needed some kind of dummy data to use to populate and test the project, so I decided on a shop that sells seeds - as I am also a keen gardener in real life!
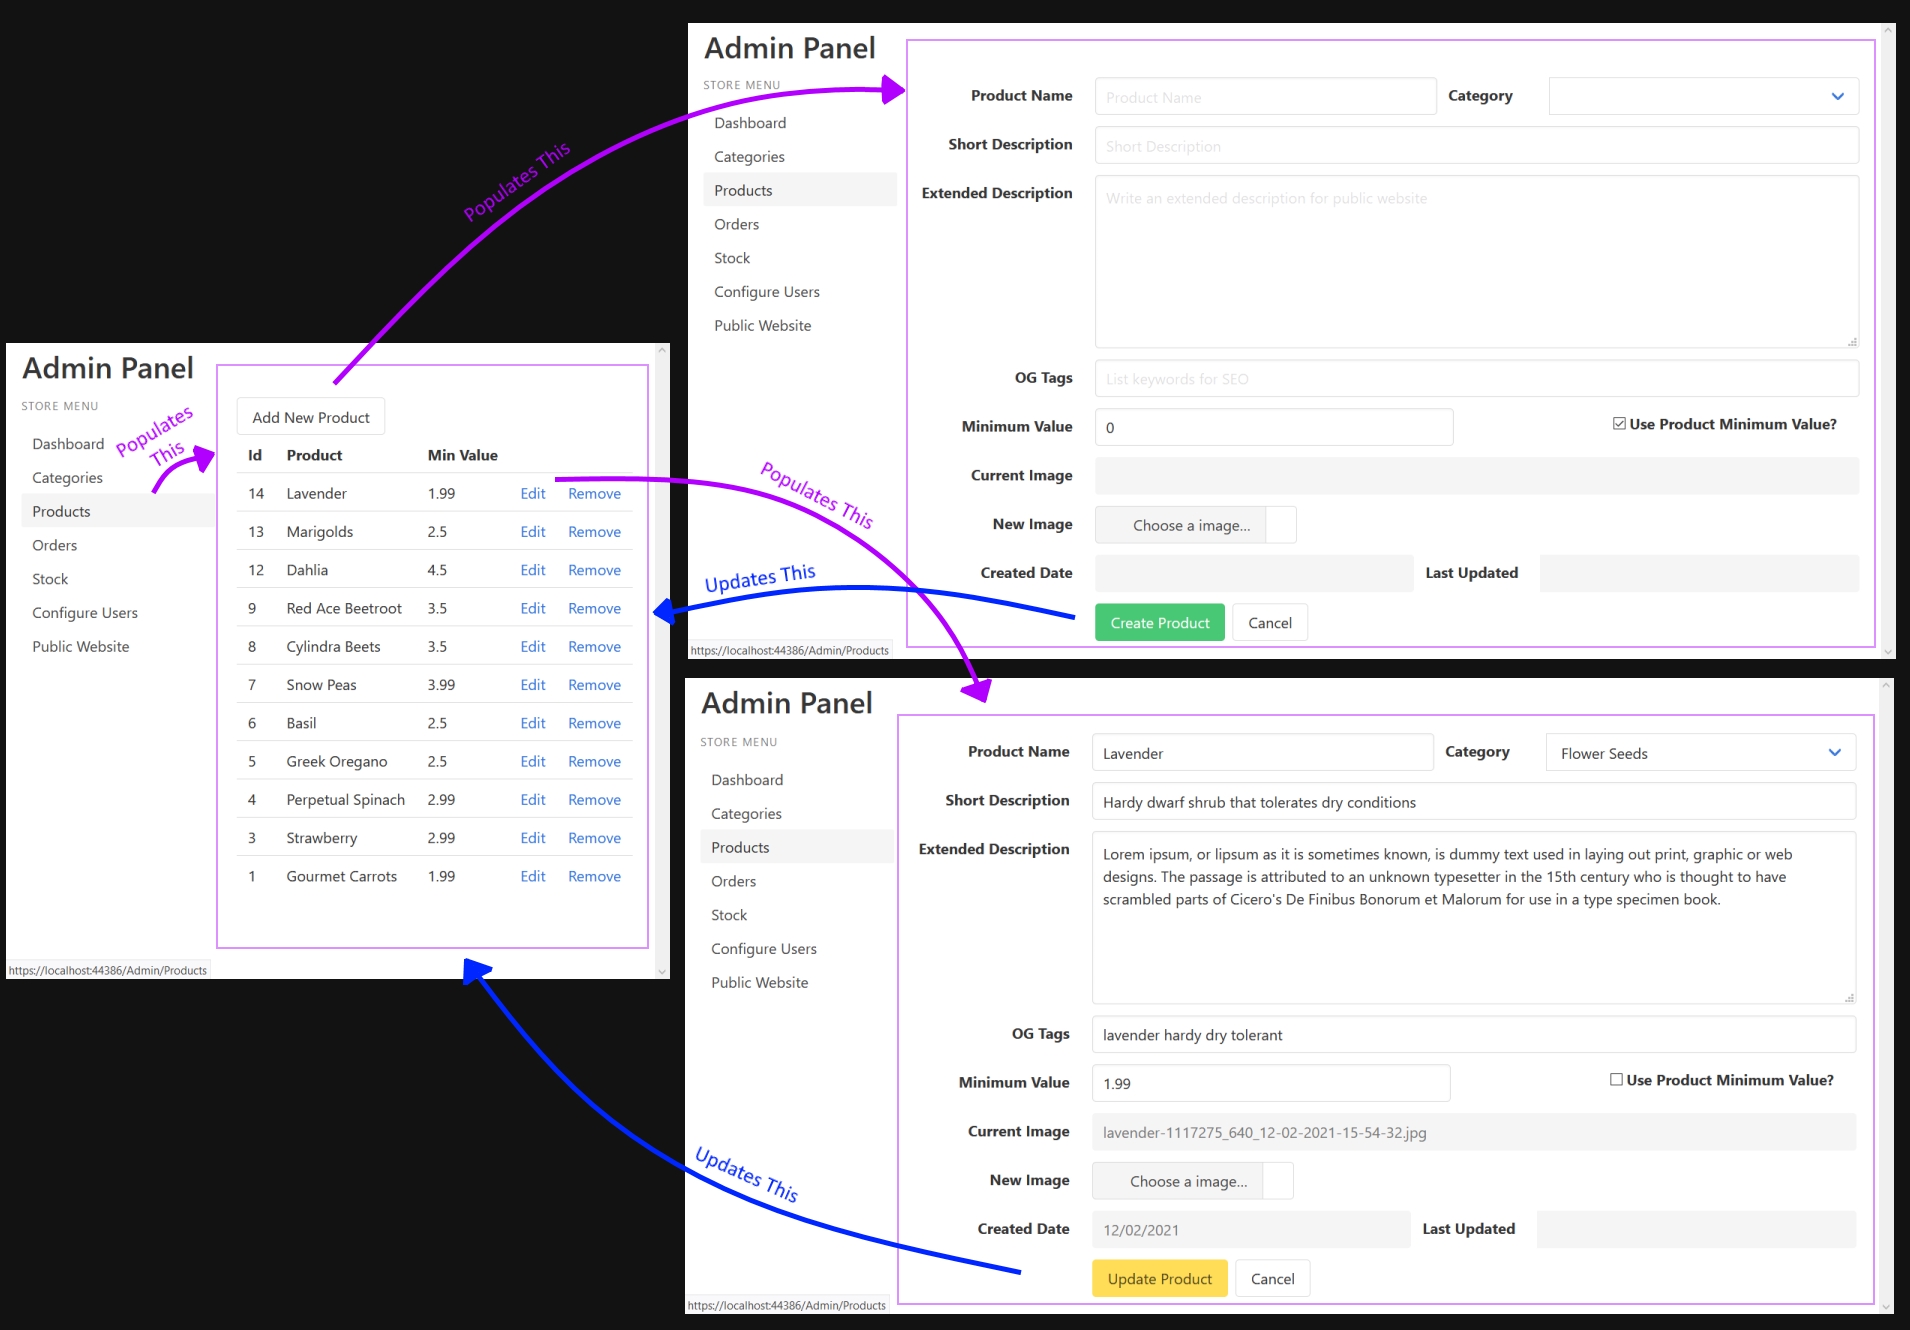
The admin product page showing the different views based on the action
Claim and Policy Based Authorization
I used claims based authorization together with policy authorization to create Admin and other client users, such as that for a Manager. It would be intended that only the Admin has the authority to add or configure users with the Manager claim, but both could interact with the rest of the Admin Panel. This could be easily extended to add other special users, especially in the case of a larger client where there may be a staff member that deals with only orders, or just with products and stock.
Regular users to the public site would have no claim to the Admin site but could potentially view their previous orders and do regular user actions such as updating their email address, contact information, reset password etc. This was done by setting up these users up with no special claims, policies or roles.
Session and Cart
Since the goal of any online shop is to sell products, I wanted to make it that a user did not necessarily have to be signed in to place an order. So I set up a session cookie that would save the details of what a particular user had in their cart at any time, which allows the store stock to be dynamically updated, so that other users of the site can see accurate stock availability. This cookie is also useful from the standpoint of the individual user because it means they can navigate away from the site but then return (within the cookie's time limit and assuming they don't delete their browser's cookies!) and their cart will still have whatever products they have placed in it.
The cart needed some special logic to enable common features seen in carts, such as the ability to add or subtract products in increments of one, remove all products from the cart and display the total value of the cart in the site's navigation bar. This was achieved by creating View Components, some vanilla Javascript with Axios and the cart CRUD operations in the Application layer.
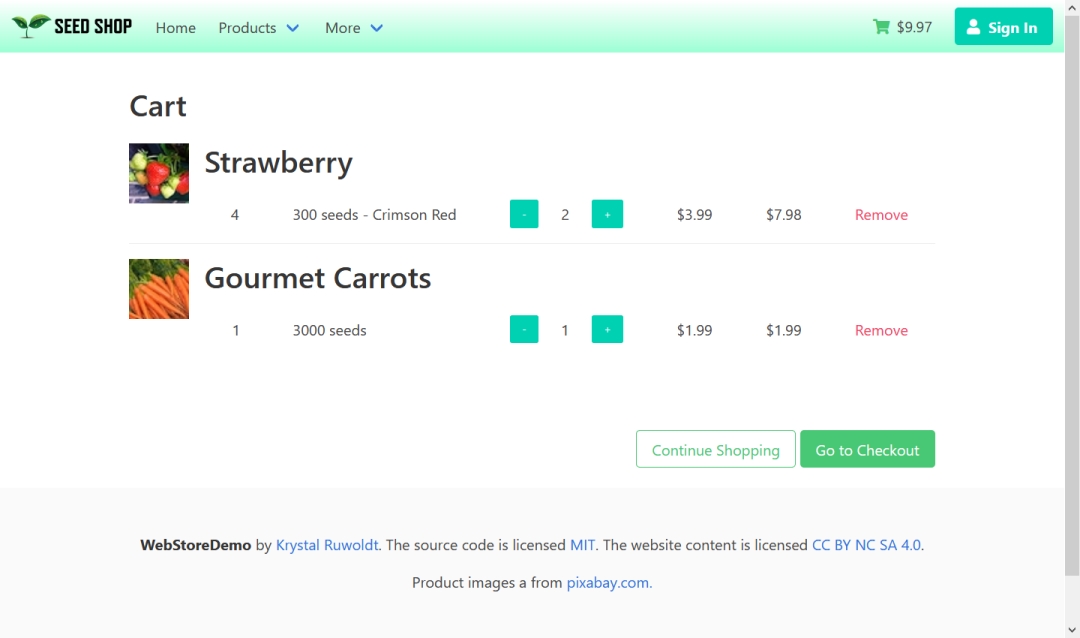
Basic cart with buttons for adding and removing quantities and cart total in navigation bar
Checkout, Orders and Integrating Stripe API
The first step in the checkout process was to capture customer information and save that to the session cache. This is a nice feature for a customer, as if they delayed submitting the order in the next step, but decided to return a bit later and go ahead with the order, their information would already be entered (saving them some time). A service was created for this in the Application layer and a page for the same in the UI. Fluent Validation was used to ensure the customer entered appropriate data in this form before being able to continue to the Payment page.
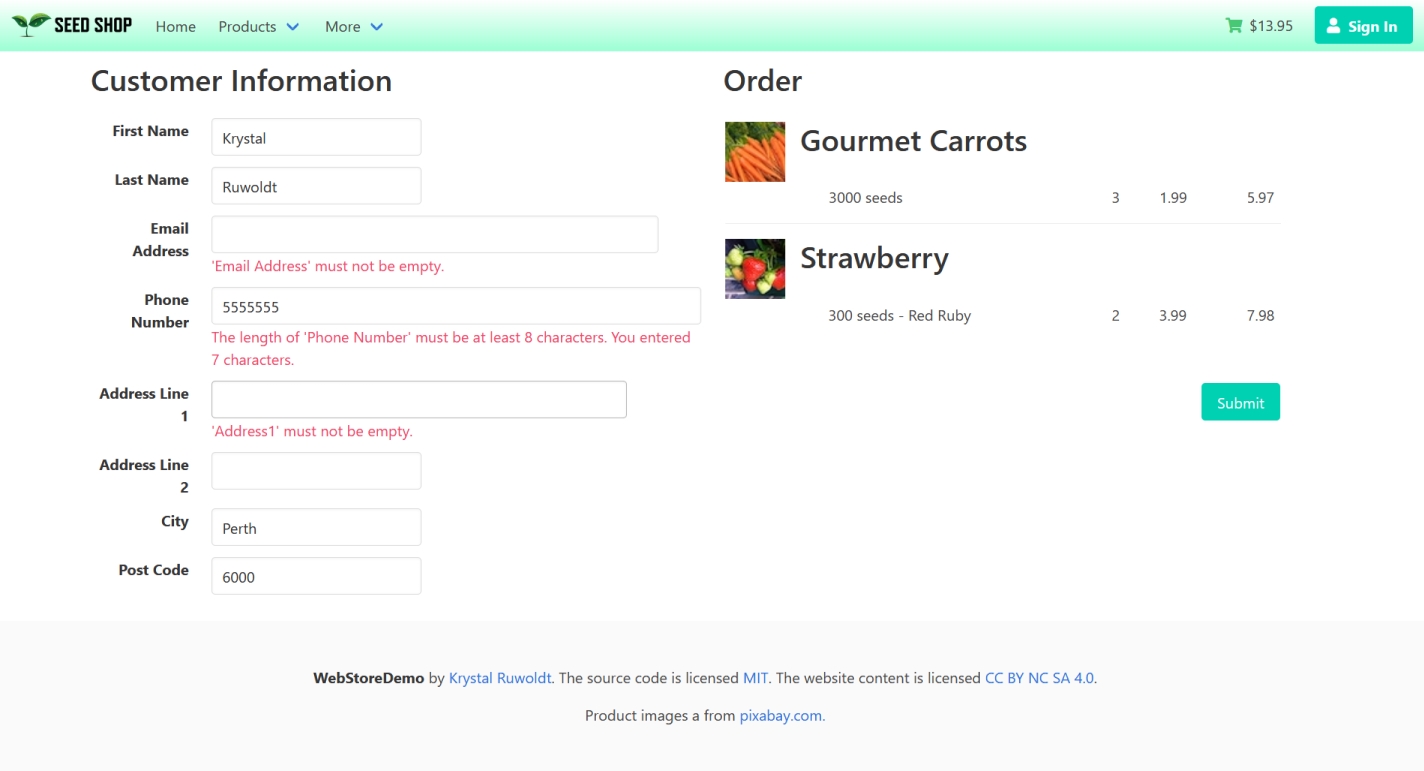
The Customer Information Page with the cart showing for the customer's reference
I used Stripe API in this demo to collect customer payments for orders, but this could also be switched out to use Paypal if a client preferred. These payment APIs should be used whenever taking payments so that credit card information never reaches the server backend. Another service was created in the Application layer to get the cart order so that the total value of the order could be calculated, so that this could be passed to the Stripe Charge Options - so the customer gets charged the correct amount!
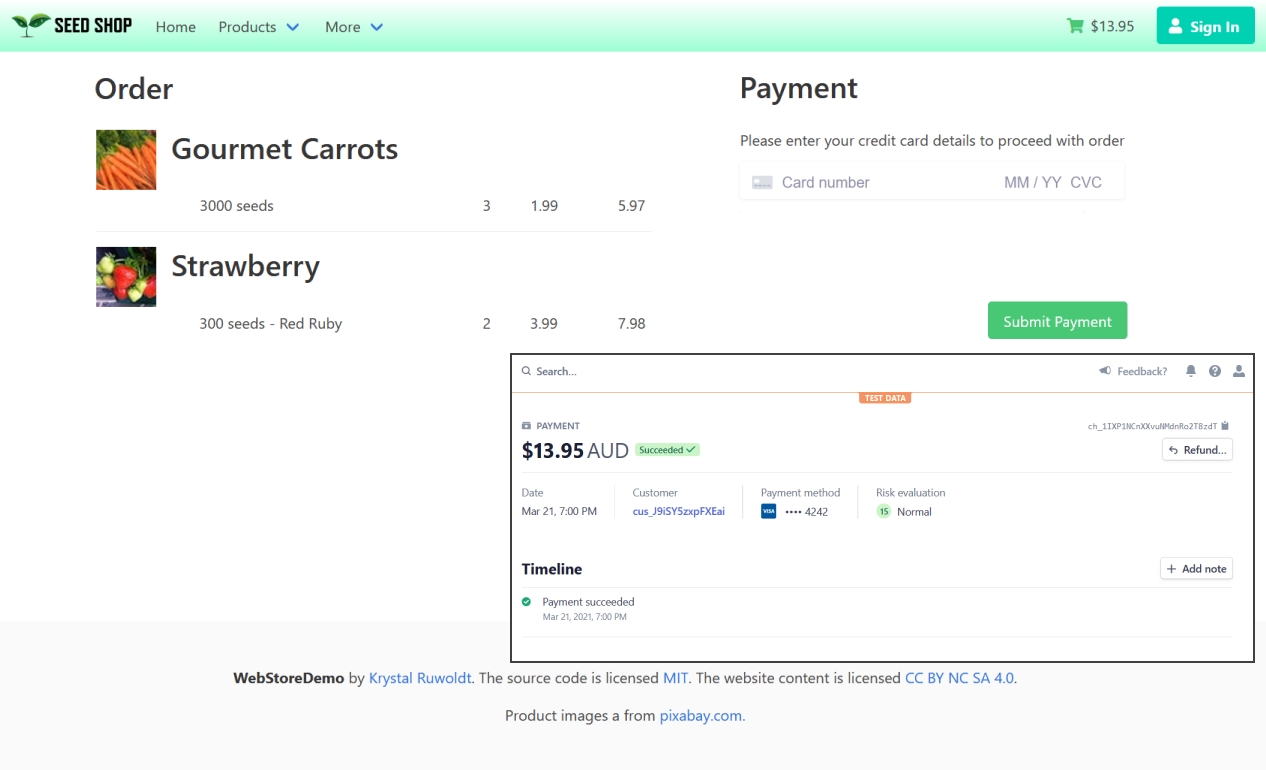
The Payment Page with a 'successful' test payment
An order needed to be created once the payment was successful, so that the cart could be cleared and stock levels updated. A Create Order service was added in the Application layer to do these tasks, which also generates the unique order reference.
Finally another service was needed to get orders so that the Admin can manage them. Some simple logic was created for the Admin to process the status from 'pending', to 'packed' and finally 'shipped'. This logic I plan to extend further to include an automated email service (check out my blog post about sending automated emails in NET Core with Mailkit), so that the customer and shop owner are notified when new orders are placed, or the status is updated. Some others features I would also include would be options to add other fees to orders, so that the client could charge shipping costs, taxes or other fees to orders.
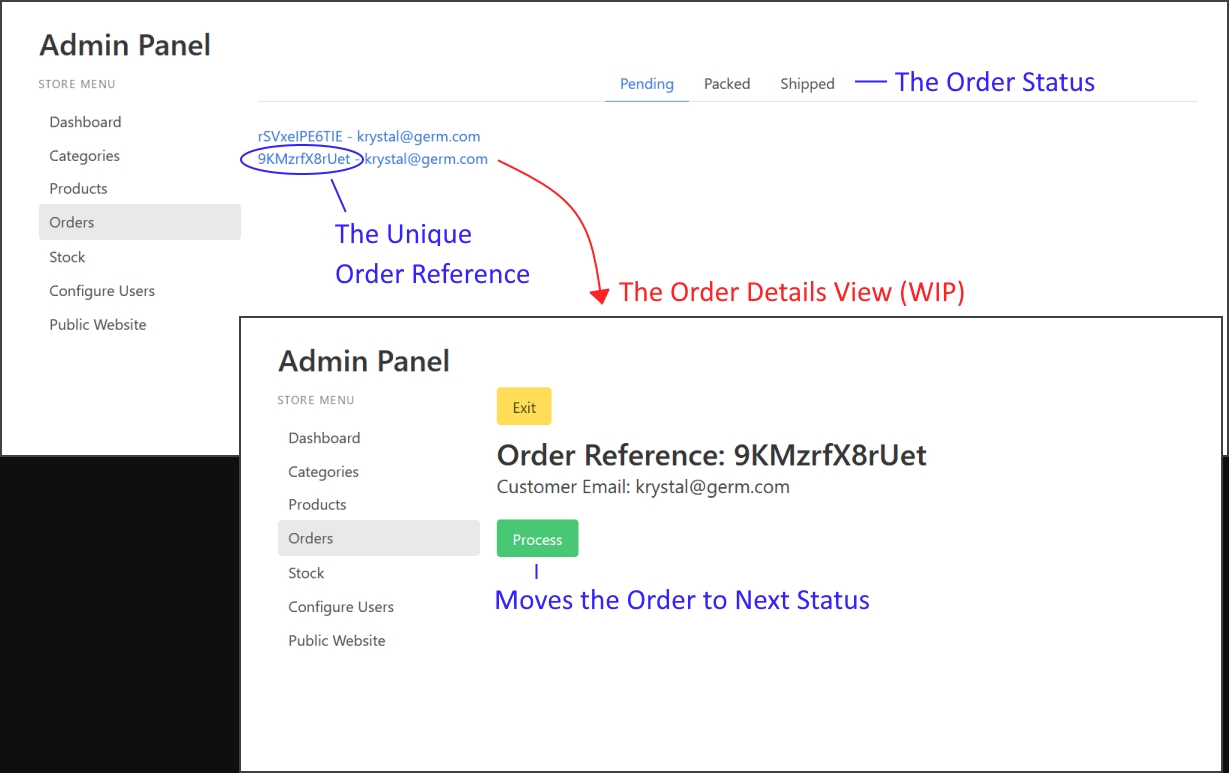
The simple Admin order process - a work in progress!
Adding Images and Categories
I added in functionality for Product Categories, which is based on one to many relationship in the database. This can be easily extended to include parent and child categories in a nested manner, if the client had a wide range of different products. A fashion store is an example of where nested categories could be of use, as they probably want to sell various clothes (shirts, pants, dresses etc) in different departments (women's, men's, children's etc).
Functionality for the Admin to add dynamic images was also included, by extending the existing models, adding a File Manager interface and implementation (similar to how this site works with images and files) and modifying the services as required. I used Photosauce Magic Scaler for resizing/scaling images as required, as manipulating the image before saving it to the website's wwwroot folder not only can reduce file sizes for faster resource loading, but also can allow creating alternate images for different design elements, such as I used to create 'placeholder' images from the product's primary image.
FileManager.cs
...
//Saving 1 uploaded product image into 2 images - a 'primary' image and 'placeholder/logo' image
public string SaveProductImage(IFormFile productImage)
{
try
{
//Get the path & if path can't be saved because doesn't exist then create it
var productSavePath = Path.Combine(_productImagePath);
if (!Directory.Exists(productSavePath))
Directory.CreateDirectory(productSavePath);
var logoSavePath = Path.Combine(_productLogoImagePath);
if (!Directory.Exists(logoSavePath))
Directory.CreateDirectory(logoSavePath);
//Get the mime & fileName, done this way to prevent internet explorer errors
var mime = productImage.FileName.Substring(productImage.FileName.LastIndexOf('.'));
//Generate just the file name so it can be copied over to asset files instead of generic tag
string fileWithExt = productImage.FileName;
string[] file = fileWithExt.Split('.');
string fileNoExt = file[0];


var productFileName = $"{fileNoExt}_{DateTime.Now:dd-MM-yyyy-HH-mm-ss}{mime}";
var logoFileName = $"{fileNoExt}_{DateTime.Now:dd-MM-yyyy-HH-mm-ss}{mime}";
//Get the filestreams and then save the images
using (var productFileStream = new FileStream(Path.Combine(productSavePath, productFileName), FileMode.Create))
{
//Image processing to make files smaller, same size etc doesn't have an async method
MagicImageProcessor.ProcessImage(productImage.OpenReadStream(), productFileStream, ProductImageOptions());
}
using (var fileStream = new FileStream(Path.Combine(logoSavePath, logoFileName), FileMode.Create))
{
//Image processing to make files smaller, same size etc doesn't have an async method
MagicImageProcessor.ProcessImage(productImage.OpenReadStream(), fileStream, LogoImageOptions());
}
return productFileName;
}
catch (Exception e)
{
Console.WriteLine(e.Message);
return "Error";
}
}
Add Design Features for Public Site
Currently I am adding some design features and additional functionality to the public site. Since this is a template project, the overall style of the site is based on using just the default Bulma CSS. In production, the client would likely have their own design style already, which is where I'd make use of creating a custom theme using Bulma's SASS variables.
I implemented the basic Bulma responsive navigation bar and footer for the public site, set up the basic structure for privacy consent cookie acknowledgement and created a blank page where the client might outline their privacy policy. Links have also been created for a Contact page and About page, and I will add more links for Website/Shop Terms of Use - something that will be needed considering the site will not only collect personal information but uses cookie's AND will do transactions with customers.
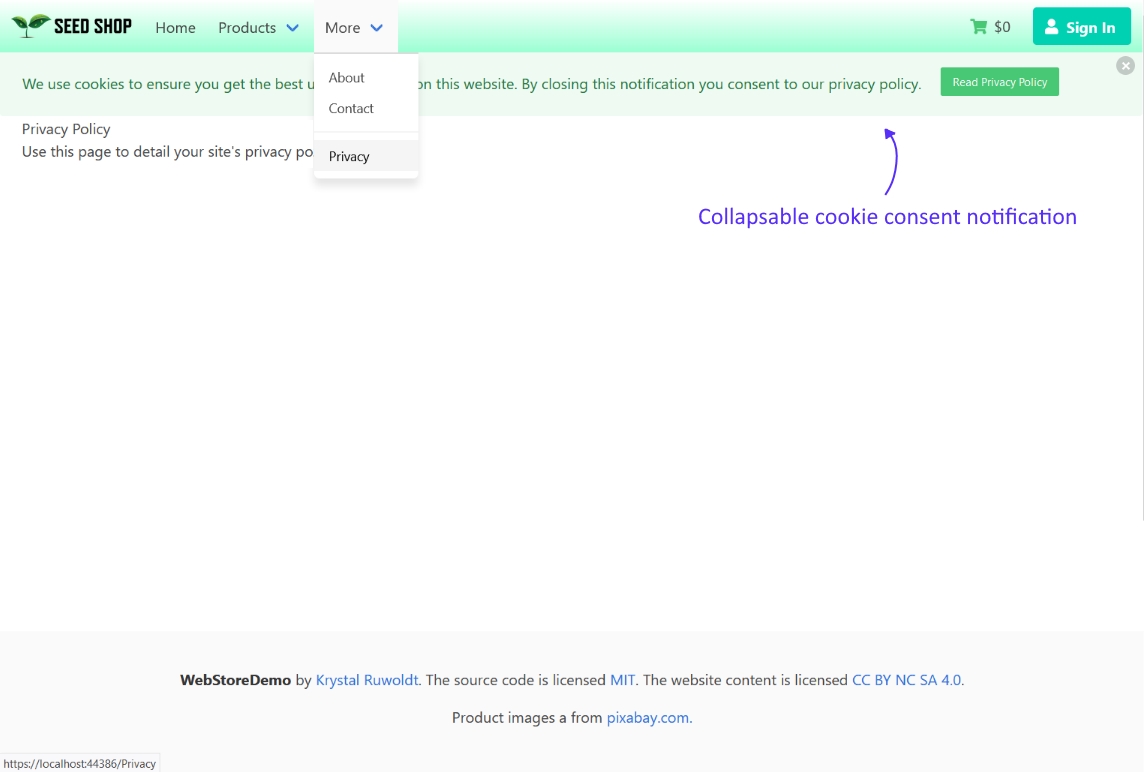
Collapsable cookie consent notification persists across site until user consents
I also created a vanilla Javascript carousel for the index page, dynamically linked to the shop's categories. It is a basic carousel which can be extended and restyled depending on how the client would like this component to function and appear, and could be used on other pages for different purposes.

Vanilla Javascript carousel that clicking on redirects to that category's page
A section on the Index page showing the latest product records was also added. These use Bulma's card component, as does the All Products page, which obviously display all the shop products. I'm currently adding some search functionality and a paginator to pages that display products (whether limited by category, search criteria or all), as the shop may have hundreds or even thousands of products to sell!
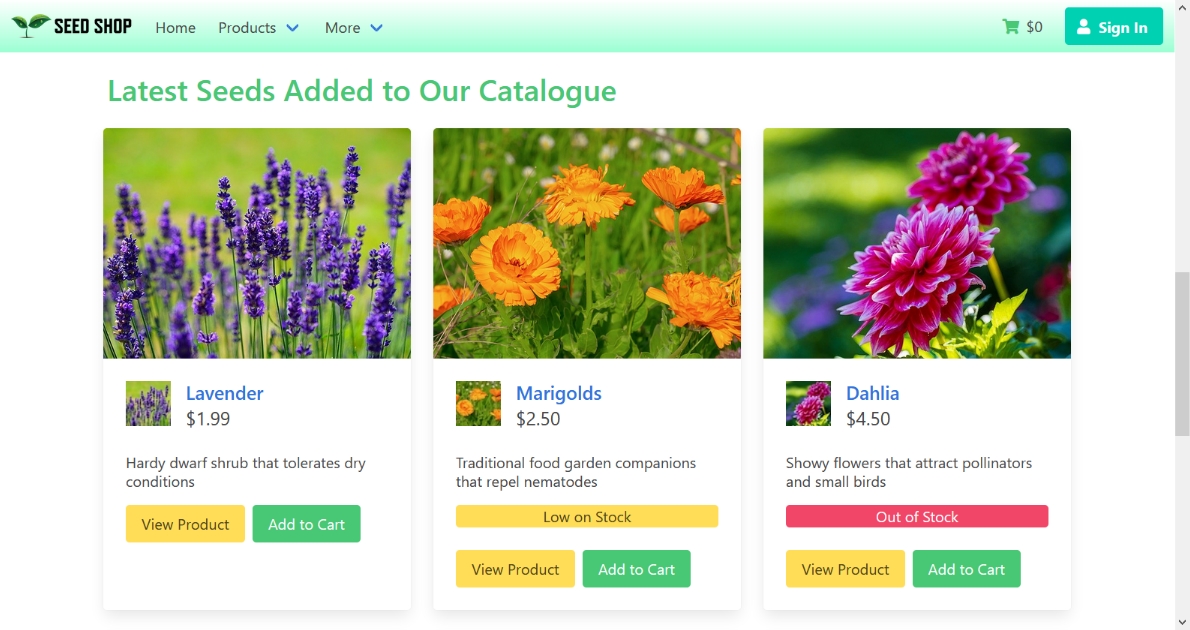
Product cards also show a notification if out of stock or low in stock
The individual product page displays all the information on that product, with an extended description field for any extra information the client wants to include on a product. Depending on the size selected and quantity entered by the user, the Add to Cart button populates these values into the user's cart (using the session cookie discussed earlier).
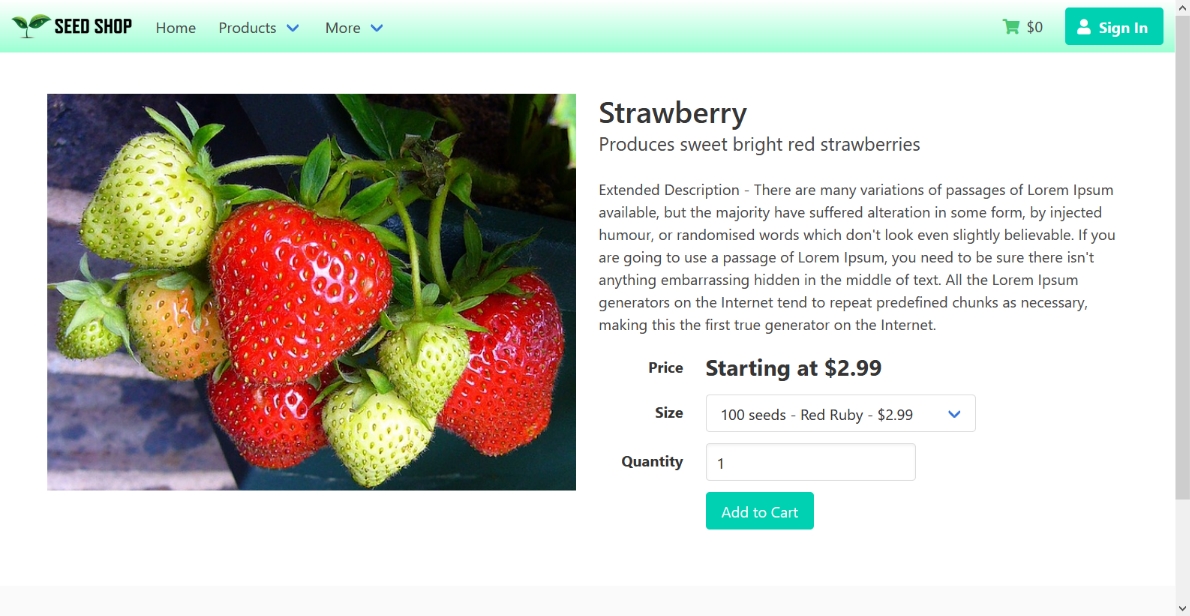
Individual product page
There are still a number of minor design corrections or enhancements to do for the cart and checkout pages, which mainly just involve tweaking the CSS or adding a few labels etc. However as I plan to add a few more features and functionality to the template, and this project's primary purpose is that of a template and not a production site, I am more concerned with building additional and enhanced features and functionality than fancy design for the sake of design!
Development Tasks in Progress
Order Shipping/Tax Functionality
Besides currently working on the search feature and paginator for pages that can display endless cards, I plan to add functionality for a client to charge tax, shipping or other charges to an order. This will require a bit of work in the middle and backend layers, a new section for the Admin to manage these options in the Admin UI and then the Cart and Checkout pages will be updated accordingly.
Registered User Features
I will be adding registered user features such as the abilities for a user to view their past orders or update their shipping address. Logic for signed in users to have the Customer Information page pre-populated with their data can also then be set up.
Design of Admin UI
The Admin UI is very plain at the moment, so some styling will definitely be applied to have it reflect the design of the public site. The landing page of the Admin UI will be a 'dashboard' displaying a variety of information about the site for the Admin. View Components will probably be used here to display data such as latest orders or low or out of stock notifications.
Final Development Tasks
These final tasks I have penciled in to complete during the development process or post design:
- Add in a logger service and use Fluent Validation in the Admin UI;
- Add a default contact page and email service, integrating the email service with the order process;
- Integrate reCaptcha into the site's public forms as required and add an embedded Google Map based on customer's address on the Contact page;
- Extend dynamic image logic to support using a CDN (a content delivery network - something I am already working on for this site to speed up first visit and first page load!);
- Add functionality for client's blog; and
- Review the overall template to identify features or functionality I could improve or extend.
Many ideas I had for the structure of this generic template and many of the features I have already implemented into it will provide improvements to this website, as well as being a generic template for generating real web store sites VERY quickly. I will be updating this article as I implement more of the planned features sometime very soon!